
My goal is to give you the base understanding to the VRF in an easy to understand way. VRF is one of the important technology for Cisco exams as well as your network career.
Introduction
What is VRF?
VRF- Virtual Route Forwarding, is the concept of implementing completely separated virtual routing instances on a physical router. Think of VRF like virtual computing in the routing world. You have a physical router and on top of that you make multiple routing instances working completely isolated from each other. Each VRF instance has a separate routing table and forwarding table.
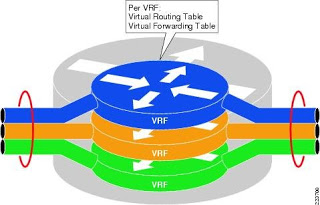
VRF Instances of a Router
Who uses VRF most?
VRF is primarily used by ISP’s to route it’s customer organization traffic through their infrastructures. So multiple customers can use ISP’s giant routing infrastructures at a fraction of a cost to transfer there traffic between multiple sites securely. ISP’s use MPLS (Multi Label Packet Switching) with VRF to achieve this functionality.
What is VRF lite?
VRF lite is the cisco given name to VRF when used without MPLS. Or we can say vanilla VRF technology is called VRF Lite 
Scenario
Let’s build some lab to be familiar with VRF configuration. To keep things simple and give you a digestible amount of commands I will use a simple GNS3 lab.
In our lab scenario administrator need to run two separate network instances on existing routers. Here blue and red networks belong to two subsidiary companies. Two companies transfer secret information so they cannot use a single routing network :).
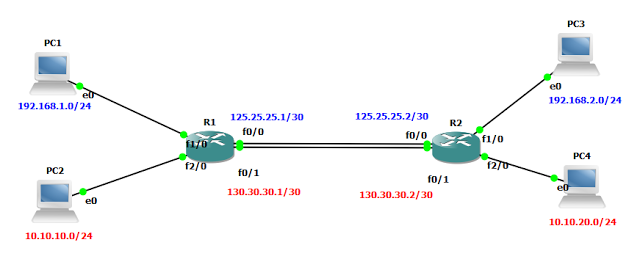
VRF Lab Diagram
Configuration
Let’s go to the R1 router and start the configuration.
Prepare two VRF instances for both networks
R1#conf t
R1(config)#ip vrf blue
R1(config-vrf)#description Company Reds, traffic
R1(config-vrf)#exit
R1(config)#ip vrf red
R1(config-vrf)#description Company Blue’s traffic
Optional : Using description command you can add some text to identify the VRF instance in future.
Now let’s go to each interface and assign them to the particular VRF instance.
R1(config)#interface fastEthernet 0/0
R1(config-if)#ip vrf forwarding blue
R1(config-if)#ip address 125.25.25.1 255.255.255.252
R1(config-if)#no shutdown
R1(config)#interface fastEthernet 0/1
R1(config-if)#ip vrf forwarding red
R1(config-if)#ip address 130.30.30.1 255.255.255.252
R1(config-if)#no shutdown
Do this interface configuration to all attached interfaces of both routers as per the diagram.
That’s it we have just finished the VRF Lite configuration :). Yes it is that much simple!. Now both routers running virtual routing instances for your two networks. We can verify this with following commands.
R1#show ip route
In an general router once you enter the above command it will list all the routes including the connected routes but once you assign your all interfaces to VRF instances properly both router’s general routing table will show nothing.
R1#show ip route vrf red
to view routing tables of separate VRF instances you have to use the above vrf name added show commands. It will show all the configured routes under the given VRF instance.
Let’s see the way to implement routing for these VRF instances. I will use ospf but you can use any routing protocol based on your preference.
R1(config)#router ospf 1 vrf blue
R1(config-router)#router-id 0.0.1.1
R1(config-router)#network 192.168.1.0 0.0.0.255 area 0
R1(config-router)#network 125.25.25.0 0.0.0.3 area 0
R1(config-router)exit
R1(config)#router ospf 2 vrf red
R1(config-router)#router-id 0.0.1.2
R1(config-router)#network 10.10.10.0 0.0.0.255 area0
R1(config-router)#network 130.30.30.0 0.0.0.3 area 0
You can see the vrf name is appended to the general ospf process starter command. The rest of the configuration is same as you do in a general ospf process.
Go ahead and configure the router two also as per the diagram. Once you finished PC1 and PC3 will communicate between each other using the blue network and PC22 and PC4 will use the red network for their communication.
Note : To troubleshoot in VRF instances you have to add the VRF name to the command as below.
R1#ping vrf blue 192.168.2.1
R1#traceroute vrf blue 192.168.2.1
After setting up the OSPF process for the first time you can use the general ospf process command below to access the OSPF process.
R1(config)#router ospf 1
Hope this helped you with understanding VRF and VRF Lite with a lesser effort than I did :).
Good day! Would you mind if I share your blog with my twitter group? There’s a lot of people that I think would really enjoy your content. Please let me know. Thanks